Showing posts with label In English. Show all posts

Thursday, 17 March 2016

Difference Between Windows 10 Enterprise and Professional

Difference Between Windows 10 Enterprise and Professional, Compare windows 10 editions features Windows 10 Pro vs Windows 10 Enterprise vs Windows 10 Home vs Windows 10 Education

Difference between windows all version for Existing Fundamentals

Difference between windows all version for Existing Fundamentals


Difference between windows all version for Management and Deployment - 

Difference between windows all version for Management and Deployment

Difference between windows all version for security - 

Difference between windows all version for security

Difference between windows all version for service features - 

Difference between windows all version for service features

Source - https://www.microsoft.com/en-in/WindowsForBusiness/Compare

Monday, 15 February 2016

how to show hidden files in windows 10

Windows 10 show hidden files and folders, how to show hidden files in windows 10, how to unhide hidden files windows 10, Windows explorer show hidden files -

To show the hidden files and folders, operating system files on your Windows 10 PC, you can follow simple steps given below - 

Step 1- Open "File Explorer" or "This PC (My computer icon)" on your computer - 


Step 2 - Click on view - 


Step 3 - Click on Options and this will open a box- 


Step 4 - Select "show hidden files, folders and drives option


Once you will select "show hidden files.." option, it will show all hidden files except system files. To show operating system files you need to uncheck from "hide protected OS files.."- See below - 


--------------------------

How to open add remove programs in windows 10

How to open add remove programs in windows 10 and uninstall a program, windows 10 uninstall programs, how to uninstall programs windows 10

You can open "add / remove programs" in windows 10 (given two methods) and select program / software which you want to uninstall - 

Method 1 - (by command)

Press the Windows + R key combination to open "run box", then type "appwiz.cpl" command and enter. It will open "Programs and Features"-


Above command will open "programs and features" box -


Now select program which you want to uninstall and click uninstall- This will prompt for uninstallation and then will remove program/software from your computer. 


Method 2 (without command)

Right click on Start button and choose "Control Panel" -


it will open up control panel- click "programs-uninstall a program" option and select a program from the list and uninstall it- 


This post will help you to open "add remove program" and uninstall a program from the list. 
--------------------------

Sunday, 31 January 2016

How to boot Windows 10 in Safe Mode from Startup

How to boot Windows 10 in Safe Mode from Startup, Start windows 10 in safe mode, enable the F8 boot options menu in Windows 10

How to boot Windows 10 in Safe Mode (Using F8 key) - If you can login in windows 10 then its very easy to reboot system in safe mode but if windows gets corrupt and you get not successfully boot windows  10 then you can follow below step to get safe mode using F8 key - 

Step 1 - Use windows 10 bootable USB drive.

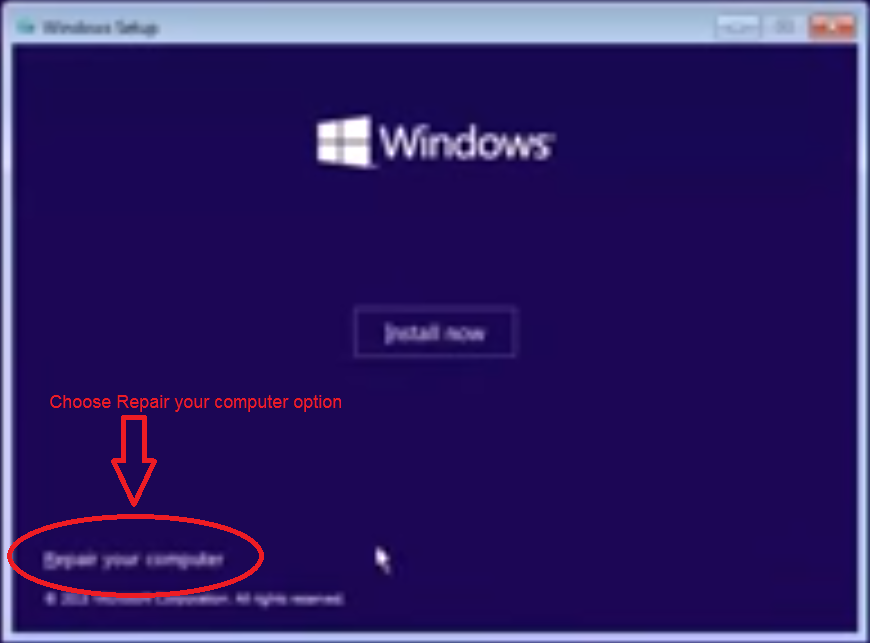
Step 2 - Change BIOS setting to boot computer from USB drive or press a key (which will give you option to boot computer from USB drive) to boot from USB . Choose "repair your computer" from below - 


Step 3- It will ask few options, choose suitable options - Troubleshoot > Advanced options > Command Prompt. 


At the command prompt, enter below commands and restart computer. After this you will be able to boot windows 10 in safe mode using F8 Key. 
 c:
 bcdedit /set {default} bootmenupolicy legacy

exit


Step 4- Now when your computer start keep pressing F8 during the boot process. Once it has been detected, you'll see the boot options menu where you can boot directly in to safe mode:-


In future if you want to disable or reverse this process use following command on the command prompt - 

bcdedit /set {default} bootmenupolicy standard

Now Windows 10 default faster boot will enable and F8 key will not give option to go in safe mode. 

--------------------

Saturday, 16 January 2016

How to reset CMOS or BIOS settings

How to reset CMOS, How to clear CMOS Jumper, how to reset BIOS to default, How to reset CMOS or BIOS settings

Three ways to clear or reset BIOS / CMOS setup - 

1. Go to BIOS Setup and find "load setup defaults"

2. Open your PC box or "laptop back cover" and find CMOS battery on the mother board. Remove battery and after few minutes mount again. 

3. Find jumper settings on the mother board and reset it. 


Thursday, 17 December 2015

How To Add A Facebook Like Button to Blogger Posts

How To Add A Facebook Like Button to Blogger Posts

Facebook Like button on your blogger post may helpful to increase visibility or to know audience choice and feedback. To know how to add facebook like button on blogger post, follow below steps and add few lines code with facebook plugin into your blogger. 

Step1

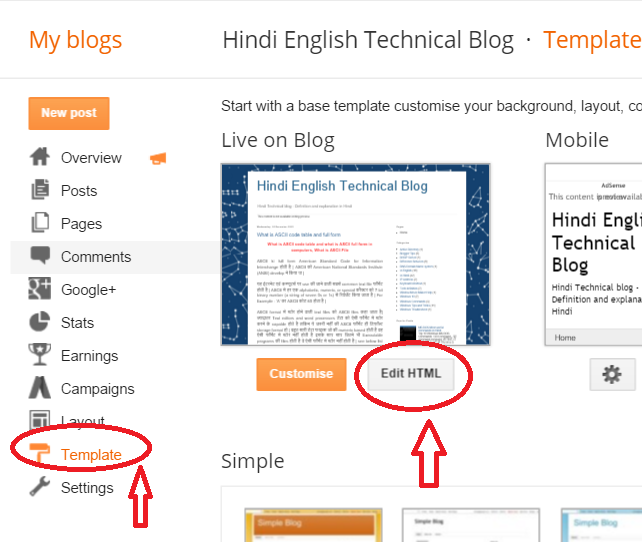
Go to your Blogger Dashboard and choose Edit HTML under template - 

Facebook Like button on Blogger


Step 2

Now search <data:post.body/> in your code area ( Press CTRL + F Key to search it). You might find it 2 or more time but you need to copy this after 2nd instance of code. If it does not work for 2nd instance you can try to copy before 3rd instance. You need to copy code before this line of code (<data:post.body/> )See below - 
Facebook Like button on Blogger

Step 3

Now copy given code and paste it - 

<p><iframe allowTransparency='true' expr:src='&quot;http://www.facebook.com/plugins/like.php?href=&quot; + data:post.url + &quot;&amp;layout=button_count&amp;show_faces=false&amp;width=100&amp; action=like&amp;font=arial&amp;colorscheme=light&quot;' frameborder='0' scrolling='no' style='border:none; overflow:hidden; width:100px; height:20px;'/></p>

After this save your template and check blogger, you should find Facebook Like button on every post.  See example - 

Facebook Like button on Blogger

Thursday, 10 December 2015

Customize the Width of Blogger Posts

In this Blogger post, you will learn how to increase, change or customize width of your Blogger Template or blogger website - 

You might feel that your blogger or website template design need to change or customize then you can follow steps and customize /increase width of your blogger - 

Step 1 

Go to your blogger dashboard and click "template".  Now click on Customise button - 

customize width of your Blogger Template

Step 2

Now click "adjust width" on the left side and adjust width using slider button. You can use this slider to increase, decrease blogger width. Here are two sliders "Entire Blog" and  "Right sidebar". See below - 

Blogger width
Blogger width


Tuesday, 24 November 2015

How To Set Up a Custom Domain in Blogger

Change Custom Domain Name for My Blog
Setup Custom Domain Name in Blogger


This is very much possible that you use blogspot domain name e.g hindipoetry.blogspot.com and later on you wanted to use your custom domain name. Your own custom domain name looks professional and easy to remember for users. Here, we are sharing tips to change blogspot sub domain name to your own professional custom domain name - See below - 

Step 1 - Go to your blog dashboard and then Settings on the bottom -> Basic Tab. Now under Publishing section, see your blogspot name and click on "set up a third-party URL for your blog" - 


Set Up a Custom Domain in Blogger

Step 2 -  Now enter your custom domain name (with www) follow Step 3. 

custom domain name in blogger
Set up a Custom Domain Name in Blogger


Step 3- It will prompt an error and also show you two CNAMEs. Each CNAMEs has two parts - one is "Name/Label/Host Name" and second is "Destination/Target/Points to".  First CNAME is same for every blogspot user but second CNAME is unique for every user as it is linked to your google account and blog. It is giving you an error because you have not linked your custom domain with google blogger hosting. Now you need to go to your Domain Provider and find DNS settings option. Under DNS settings add two CNAME given by blogspot.

Once you add these CNAMEs on your domain registrar or domain name provider, click save. Now it will save without any error. 


Step 4 - See above - If you want to open your website without www, this will not open until you will select above option (redirect domainname.com to www.domainanme.com). 

Monday, 23 November 2015

How to remove or take out sound in windows movie maker

How to mute sound on a video on windows movie maker

Many times you want to take out sound from your video clips using Window Movie Make software. You can use below simple steps to remove or adjust sounds from video clips in Window Move Maker.  

Step 1 

Open Window Movie Maker and add your video. Click on Edit Tab


Step 2

Click on Video Volume in the left, move the slider to the left or right to adjust  the volume. You can increase, decrease or mute video sound from this section. You can also do this for smaller clips or for full video.


mute sound on a video on windows movie maker

Sunday, 22 November 2015

Error failed to play test tone - Sound Won't Work on windows 7 8 and 10

No Sound, Error ! Failed to play test tone on windows 7, 8 10
Sound Won't Work on windows 7 8 and 10

Many users face this issue while working on windows machine. We are showing you few options which might resolve your windows machine sound issue.  You can try any of the below on your machine and let us know in comment section if it work for you so that it will help others- 

Option 1 

Go to your machine sound panel - either by control panel or type sound on start. Select your computer speaker and click on properties and then select advanced on next dialog box- Select "restore defaults"- Apply

Try this, it worked for many and may help you. See below

failed to play test tone

Option 2 

Open command prompt - (run as admin) and type command 
sfc /scannow. This will take some time and then you can reboot and check your computer speaker volume. See below - 

sfc /scannow
sfc /scannow

Option 3 

Go to your computer BIOS and enable Onboard audio if it is not enabled. 


Option 4

Go to Start -> Run -> services.msc


In "Services" window, select Windows Audio and restart this service. 

Option 5


Go to your machine sound panel - either by control panel or type sound on start. Select your computer speaker and click on properties and then select "enhancements" tab - > now click "Disable all Sound Effects" - >Click OK and apply
Try your sound now.


Option 6

If none of above work then you should remove your sound device driver and install latest drivers


Saturday, 21 November 2015

how to stop copying content from blogger

How to Disable /Stop Copy Paste content from your Blogger Blog

Prevent from Copying Your Content from Blogger


You might have faced this issue that people copy your blog post content and use it for their own purpose. They might use stolen content on their website or for other commercial purpose. Now don't worry we will provide a way which you can implement on your blog and prevent them. Follow steps - 
Step 1 - Login to your blogger account and go to Layout -

Prevent from Copying Your Content from Blogger

Step 2 - Once you click Layout tab, it will show many options - select "add a gadget" - In the Gadget, select select " HTML/Java Script" -

Prevent from Copying Your Content from Blogger

Step 3 - In the box- copy and paste content - (see below)

<!—start of prevent copy paste content-->
<script 
src="demo-to-prevent-copy-paste-on-blogger_files/googleapis.js">
</script><br /><script type="text/javascript">
if (typeof document.onselectstart!="undefined" ) { 
document.onselectstart=new Function ("return false" ); } else{
document.onmousedown=new Function ("return false" ); 
document.onmouseup=new Function ("return true" ); } 
</script>
<!—start of prevent copy paste content--></!—start></!—start>


Prevent from Copying Your Content from Blogger


Step 4 - save this and visit your blog. You will find that you can not right click anywhere on the blog content. 

Windows 10 keyboard shortcuts

Keyboard shortcuts - Windows 10 keyboard shortcuts


Here are some popular windows 10 keyboard shortcuts which are combination of two more more key. These windows 10 keyboard shortcut will help you in day to day windows activities - 

Thursday, 19 November 2015

Remove or Hide Blogger Navbar Topbar or Titlebar

How to remove or Disable blogger Top Bar / Navbar

Every Blogger has default gadgets and one of them is Navbar on top. You can control these gadgets from Layout tab. Follow steps to disable, remove or choose another Navbar on your blog. 

Step 1- Login your Blog and go to "Layout" Tab 


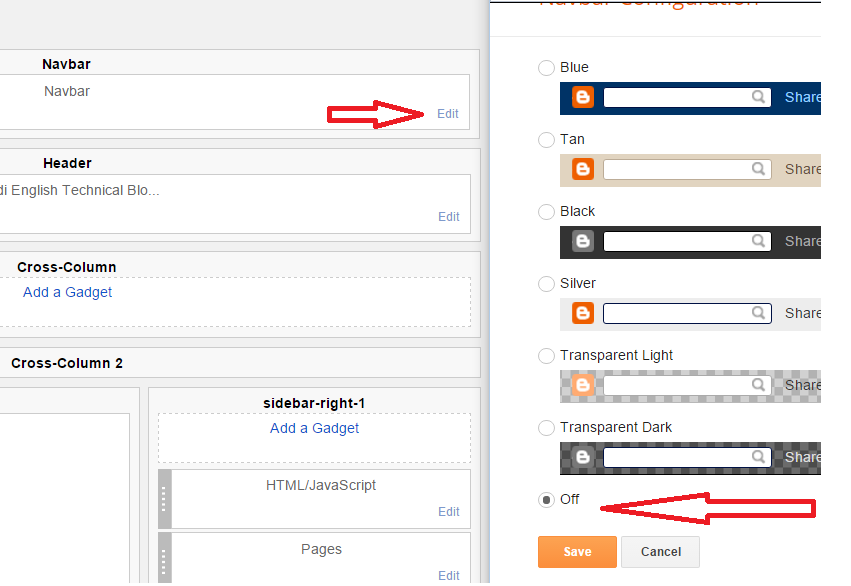
Step 2 - On the NavBar, Click Edit. this will pop up Navbar window with different options. Scroll down and choose "Off" to disable Navbar from your blog. 


This is all. It will remove Navbar from your blog. Later on if required you can follow above steps and enable it.


How to enable or disable Hibernate in Windows 10

Disable hibernate in windows 10

You can ON or OFF hibernate in windows 10 using command:- 

Step 1 - Click Start (windows logo) and select "Command Prompt" as admin - To do right click on the "command prompt" and select "Run as administrator"

Or 

Press Windows + X keys to open menu and select Command Prompt (Admin) option - See below 

Windows + X key in windows 10

Step 2 - On the Command Prompt Type - powercfg /h ON - It will enable hibernate on your machine

Step 3 - On the Command Prompt Type - powercfg /h off - It will disable hibernate on your machine

See Screen shot below - 

enable or disable Hibernate in Windows 10
Enable or Disable Hibernate in Windows 10

Wednesday, 18 November 2015

Default userName and Password Dlink DI-624 Models

What is the default User Name and password for DI-624 Series Routers and Modem?

Dlink D-624 has many models and all have same user name and password - 

Dlink - DI-624, DU-624+, DI-624M, DI-624S, DI-624V2, DI-624V3, DI-624V5

Default User name and Password for all (above model) is admin / blank (no password)


Monday, 9 November 2015

How to Back Up Barracuda NG Firewall Configuration file


How to back up and restore 
Barracuda NG Firewall configuration file

To back up the Barracuda NG Firewall - > 
1. Log into the Barracuda NG Firewall.
2. Go to the Configuration Section 
3. Click on Configuration Tree.
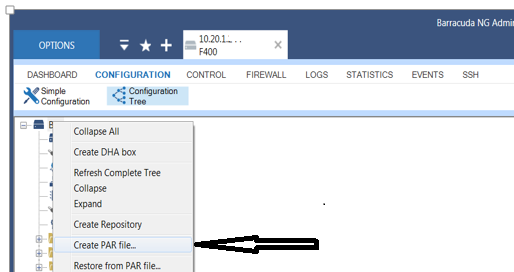
4. Right-click Box and select Create PAR file and Save file to a suitable location...

To understand this - See below :- 

back up and restore Barracuda NG Firewall configuration file
back up and restore Barracuda NG Firewall configuration file


back up and restore Barracuda NG Firewall configuration file
back up and restore Barracuda NG Firewall configuration file


To Restore the Barracuda NG Firewall Config from backup file -


1. Log into the Barracuda NG Firewall
2. Go to the Configuration Section 
3. Click on Configuration Tree
4. Right-click Box and select Restore from PAR file. Select the required PAR file.
5. Click Activate. 
6. Go to the Control > Box page.
7. In the left navigation pane, expand Operating System and click Firmware Restart. Click Yes to confirm that you want to restart the subsystem.
8. Expand Network and click Activate new network configuration.
9. Select one of the following network configuration activation modes:  
  a) If the new management IP address and management port are different from the ones currently configured on the appliance, click Force.

  b) If you are continuing to use the same management IP address and management port, click Failsafe.


Disable hiberfil.sys in windows 7 / 8.1

How to delete or disable hiberfil.sys on windows 7 / 8.1 

hiberfil.sys file is related to hibernation so if you do not need hibernation you can delete hiberfil.sys file by disabling a simple window command - 

Follow these steps: - 

Step 1- 

Click Start, and then type cmd in the Start Search box.

Right-click Command Prompt, and then select Run as Administrator option.

Step 2 -

At the command prompt, type 
:> powercfg.exe /hibernate off 
then press Enter.

delete or disable hiberfil.sys on windows 7
delete or disable hiberfil.sys on windows 7

This will delete hiberfil.sys file and disable hibernation on your machine. If you want to enable hibernation again Click here...


CiSCO Device configuration backup using TFTP Services

How to take backup of CISCO router / switch using TFTP Server

Step 1 

Download tftp server on your PC from - 


Step 2 

Install TFTP -  Configure Root Directory and other settings ...
see below :- 

Set root Directory to C Drive or any other location where you want to save config backup - 

TFTP Server root directory


Step 3 

Enable telnet service on your PC and open command prompt -

type command -> telnet CISCO-device-IP
> give admin password
> go to "en" 
type - >copy running-config tftp
give your TFTP IP ( where it is installed) >10.20.1.X
type file name> cisco-backup

Done- See below  ( you can open tftp server same time and see its status as below) 

See below - All the above command in a single window- 

backup cisco config using tftp server and telnet command
How to take Cisco device Config file backup using telent and tftp server 

Now you should go to your tftp server root directory and check file....


You can also visit CISCO website for more information and different ways to take backup and restore CISCO config files at - 

http://www.cisco.com/c/en/us/support/docs/ios-nx-os-software/ios-software-releases-122-mainline/46741-backup-config.html


Wednesday, 28 October 2015

Symantec Backup Exec Config Backup (exporting)

How to take or export Symantec Backup Exec Config file backup and restore it back on to Symantec backup Exec

If you want to export Symantec backup policies and config backup, you can copy the entire data folder from the backup Exec installation directory to the some other location. Later on you can restore this by overwriting it to the 'data' folder. After replacing the new data folder with the old data folder, restart the backup exec services. It should bring all your jobs and configuration back.

DATA folder Path - "C:\Program Files\Symantec\Backup Exec\data"

Symantec backup policies and config backup

Note - To copy data folder you need to stop sqlserver (backupexec) service from services. 


Monday, 26 October 2015

Cannot Start Microsoft Office Outlook Cannot Open the Outlook Windows

Outlook is giving error - Canot start Microsoft Office Outlook. Cannot open the Outlook window. The set of folders cannot be opened. The file C:\Users\....xyz.pst can not be opened. 

or

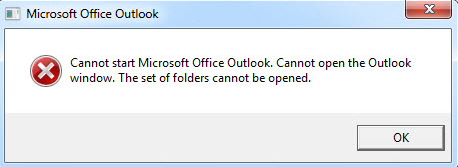
Canot start Microsoft Office Outlook. Cannot open the Outlook window. The set of folders cannot be opened.

How to fix Solved Out look Error "Cannot start Microsoft Outlook. Unable to open Outlook window" error


When I got this error in outlook 2013, i had to reboot outlook. Sometime it worked and sometime it did not. Finally i found one another solutions which permanently resolve issue and i was not required to reboot anymore:- 

Try this might work for you :- 

Microsoft Office Outlook Error

Step 1 :- Click on Start button 
Step 2 :- Type outlook.exe /resetnavpane in search box and press enter or you can open run and type this command in the box -

outlook.exe /resetnavpane command
outlook.exe /resetnavpane command


It will reset the Navigation Pane settings and then open Outlook without error..