Sunday, 27 December 2015

What is internet leased lines and how leased line works in Hindi

Understand what is internet leased lines and how leased line works, advantages of leased line, type of leased line connections

Internet leased lines, how leased line works and type of leased line - Leased Line एक premium internet connectivity है जो की normally फाइबर channel को use करते हुए dedicated uncontended, symmetrical speeds, full-duplex कनेक्शन provide करती है | इसको अलग अलग locations or region पर different names से जाना जाता है जैसे की DIA line, ethernet leased line, data circuit or private circuit भी कहते है |
What is Lease Line
What is Lease Line
Generally leased line प्राइवेट companies द्वारा provide की जाने वाली bidirectional or symmetric telecommunications line होती है जो की एक exchange मे दो या ज्यादा locations पर monthly, quarterly or yearly rent पर दी जाती है | Leased line मे PSTN line की तरह कोई telephone number नहीं होता है एवं दोनों साइड permanantly कनेक्टेड होती है | लीज्ड लाइन को इंटरनेट के अलावा telephone or data services के लिए भी use किया जा सकता है | 

Typically, business लीज्ड लाइन को geographically distant offices को connect करने के लिए भी use करते है | Leased लाइन मे जो भी स्पीड का commitment किया जाता है वो मिलती है एवं उसमे normal conditions मे किसी भी तरह का कोई variations नहीं होता है | 

Lease Line - अलग-अलग countries एंड region मे लीज्ड लाइन को स्पीड के according categories मे divide किया हुआ है जैसे की यूरोप मे E0, E1...United states मे  T1, T2 etc..

Europe -

E0 (64Kbps)
E1 = 32 E0 lines (2Mbps)
E1 = 128 E0 lines (8Mbps)
E3 = 16 E1 lines (34Mbps)
E4 = 64 E1 lines (140Mbps)

United States, the concept is as follows:

T1 (1.544 Mbps)
T2 = 4 T1 lines (6 Mbps)
T3 = 28 T1 lines (45 Mbps)
T4 = 168 T1 lines (275 Mbps)

ज्यादातर countries इन terms को follow करते हुए अपनी country  की lease line स्पीड को मेंशन करते है |
Saturday, 26 December 2015

What is kerberos Protocol and how authentication process works steps

What is Kerberos Protocol and how authentication process works steps by step, role of Kerberos in active directory in Hindi

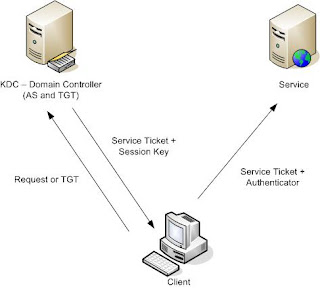
Kerberos Protocol एक नेटवर्क authentication protocol होता है यह secret-key cryptography को use करते हुए client-server applications के बीच strong authentication प्रोवाइड करता है| 


Kerberos Protocol
Kerberos Protocol
Kerberos Protocol के कुछ important characteristics निचे दिए हुए है - 

1. यह secure है - यह बिना encryption के कभी भी पासवर्ड नहीं भेजता है 

2. Single login per session - एक बार login करने के बाद यह उसी login information को use करते हुए resources को authenticate करता है एवं बार बार login required नहीं होता है |

3. यह mutual authentication perform करता है - इसमे client सर्वर की identity को approve करता है एवं server क्लाइंट की identity को | 

4. The concept depends on a trusted third party - a Key Distribution Center (KDC). KDC को नेटवर्क के सभी systems के बारे मे पता होता है एवं KDC पर सभी system trust करते है |
Kerberos ने ही Ticket-Granting Server (TGS) के concept को introudce किया था जिसमे की क्लाइंट जो की कोई सर्विस use करना चाहता है उसको एक ticket receive करना होता है इस टिकट मे time-limited cryptographic message होता है जिससे की सर्वर को access किया जा सकता है | Kerberos को एक Authentication Server (AS) भी चाहिए होता है जो की क्लाइंट्स को verify कर सके | दो servers को मिला कर KDC बनता है एवं active directory, KDC का function परफॉर्म करता है | 

Wednesday, 23 December 2015

What is NetBIOS Domain Names

What is NetBIOS Domain Names and what is the NetBIOS Domain Name of My Computer


NetBIOS Name का फुल फॉर्म Network Basic Input/Output system होता है जो की IBM, Microsoft, and Sytek ने डेवलप किया था | NetBIOS Name का मतलब होता है Name to IP resolve करना | यह  16 byte का address होता है | NetBIOS name 16 characters ASCII होता है जबकि Microsoft ने host name को 15 characters का limit किया हुआ है and 16th character को NetBIOS suffix के लिए reserve किया हुआ है | Computer NetBIOS Name एवं computer host name ज्यादातर same होते है केवल NetBIOS name मे से 15th characters के बाद के characters हट जाते है | लेकिन जरुरी नहीं है ये दोनों same हो, ये different भी रखे जा सकते है | 

NetBIOS Name port number 137, 138 and 139 पर communicate करते है| अगर आपके नेटवर्क मे ये ports disable है तो कम्प्यूटर्स आपस मे communicate करते वक़्त आपको error दे सकते है | आजकल नए network technology मे NetBIOS, TCP/IP via the NetBIOS over TCP/IP (NBT) प्रोटोकॉल run होता है | 


One Example -  File and Printer Sharing for Microsoft Networks service on a computer running Windows XP Professional, NetBIOS service को use करती है | 

NetBIOS name resolution problems को troubleshoot करने के लिए Nbtstat command बनाया गया है | 


Thursday, 17 December 2015

How To Add A Facebook Like Button to Blogger Posts

How To Add A Facebook Like Button to Blogger Posts

Facebook Like button on your blogger post may helpful to increase visibility or to know audience choice and feedback. To know how to add facebook like button on blogger post, follow below steps and add few lines code with facebook plugin into your blogger. 

Step1

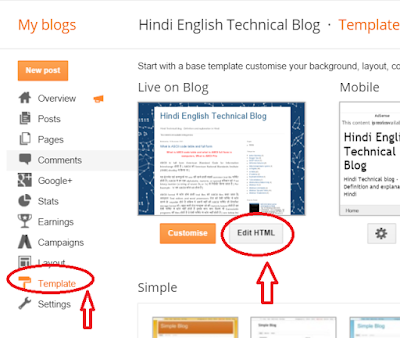
Go to your Blogger Dashboard and choose Edit HTML under template - 

Facebook Like button on Blogger


Step 2

Now search <data:post.body/> in your code area ( Press CTRL + F Key to search it). You might find it 2 or more time but you need to copy this after 2nd instance of code. If it does not work for 2nd instance you can try to copy before 3rd instance. You need to copy code before this line of code (<data:post.body/> )See below - 

Facebook Like button on Blogger

Step 3

Now copy given code and paste it - 

<p><iframe allowTransparency='true' expr:src='&quot;http://www.facebook.com/plugins/like.php?href=&quot; + data:post.url + &quot;&amp;layout=button_count&amp;show_faces=false&amp;width=100&amp; action=like&amp;font=arial&amp;colorscheme=light&quot;' frameborder='0' scrolling='no' style='border:none; overflow:hidden; width:100px; height:20px;'/></p>

After this save your template and check blogger, you should find Facebook Like button on every post.  See example - 

Facebook Like button on Blogger

Wednesday, 16 December 2015

What is ASCII code table and full form

What is ASCII code table and what is ASCII full form in computers, What is ASCII File

ASCII ki full form American Standard Code for Information Interchange होती है | ASCII को American National Standards Institute (ANSI) develop ने किया था |

यह इंटरनेट एवं कम्प्यूटर्स पर use की जाने वाली सबसे common text file फॉर्मेट होती है | ASCII मे हर एक alphabetic, numeric, or special करैक्टर को 7-bit binary number (a string of seven 0s or 1s) से रिप्रेजेंट किया जाता है | For Example - 'A' का ASCII कोड 65 होता है | 

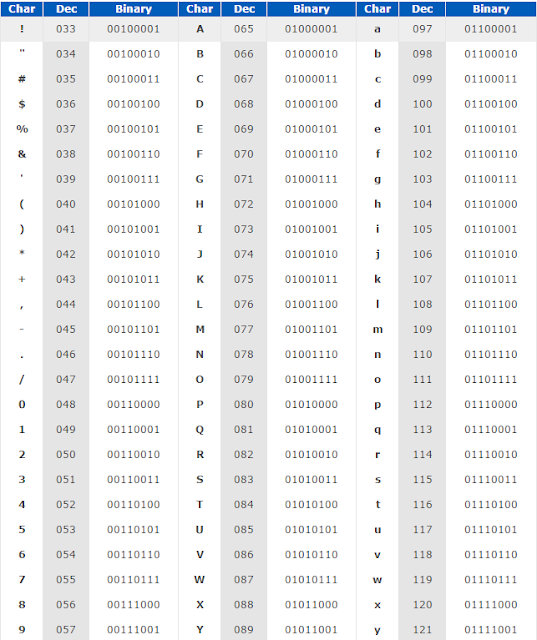
ASCII format मे स्टोर होने वाली text files को ASCII files कहा जाता है| ज्यादातर Text editors and word processors डेटा को ऐसी फॉर्मेट मे स्टोर करने के capable होते है लकिन ये जरुरी नहीं की ASCII फॉर्मेट ही डिफ़ॉल्ट storage format हो | बहुत सारी डेटा फाइल्स जो की numeric based होती है वह ऐसी फॉर्मेट मे स्टोर नहीं होती है इसके साथ साथ जितने भी Executable programs की files होती है वे ऐसी फॉर्मेट मे स्टोर नहीं होती है | see below list which shows ASCII value for any character - 

ASCII
ASCII Values


what is flash memory and how does it work

What is flash memory storage and how does it work

Flash Memory electronic non-volatile computer storage medium होता है जो की electrically erased एवं reprogrammed किया जा सकता है | फ़्लैश मेमोरी computers and electronics devices के storage के लिए काम मे आता है | फ़्लैश मेमोरी को USB Drives, computer RAM (occasionally), SSD Drives, hybrid drives (small SSD + Hard Drive), graphics cards, and memory कार्ड्स मे काम मे लेते है | फ़्लैश मेमोरी को small electronics devices मे जयदतर काम मे लेते है क्योकि ये size मे छोटी होती है, speed fast होती है एवं इसमे कोई moving parts नहीं होते है | 
what is flash memory
Flash Memory shown in USB Drive
सबसे पहले 1984 मे तोशिबा ने फ़्लैश मेमोरी को EEPROM (electrically erasable programmable read-only memory) से develop किया था | फ़्लैश मेमोरी को दो main केटेगरी मे divide किया जा सकता है जिनको की NAND एवं NOR लॉजिक गेट के बाद नाम दिया गया |

फ़्लैश मेमोरी मे डेटा को units मे erase किया जाता है जिसे blocks बोलते है | फ़्लैश मेमोरी की माइक्रोचिप मे डेटा को स्टोर या प्रोग्रम्म किये जाने से पहले इसमे स्टोर किये गए block को erase किया जाता है | ये डेटा को एक्सटेंडेड टाइम तक सेव करके रखती है चाहे डिवाइस ओन या ऑफ कर दी जाये | Flash semiconductor memory मे सबसे सस्ता होता है एवं DRAM, SRAM की तुलना मे लोअर पावर consume करता है |

Friday, 11 December 2015

What is BIOS (Basic Input Output System) in Computer

What is BIOS (Basic Input Output System) in Computer Definition- BIOS Stands for Basic Input Output System

BIOS Stands for Basic Input Output System एवं इसको System BIOS, ROM BIOS or PC BIOS नाम से भी जाना जाता है | यह एक ROM chip होती है जो की सभी machines के motherboard मे built in होती है | जब आप अपने कंप्यूटर को स्टार्ट करते है तो booting process (power-on startup) के समय BIOS hardware initialization का काम करती है | इसके साथ साथ यह OS एंड सभी programs को run time service प्रोवाइड करती है | 

Motherboard की ROM chip मे firmware code किया होता है जो की किसी भी कंप्यूटर मे run होने वाला फर्स्ट प्रोग्राम होता है एवं बाद मे कंट्रोल OS को pass कर देता है | इस प्रकार BIOS का purpose booting time मे PCs के system hardware को initialze एवं test करके boot loader or OS load करना होता है | 

ज्यादातर सभी BIOS को डिज़ाइन and कोड, PC and motherboard model के according किया जाता है| पहले BIOS firmware ROM Chip (मदरबोर्ड) मे स्टोर किया जाता था लकिन अब modern computers मे बायोस contents या firmware को flash memory मे store किया जाने लगा है जिससे की contents को edit या वापस से change करने के लिए मदरबोर्ड से नहीं निकलना पड़े | फ़्लैश मेमोरी मे स्टोर करने से फर्मवेयर को easily update or change किया जा सकता है एवं अगर कोई नए features add करने हो या कोई bug fix करना हो तो वो भी easily possible है | 

बायोस फर्मवेयर मे keyboards, disk drives, display screens, boot priority, serial communcation एवं बहुत सारे हार्डवेयर एंड PC functions को कंट्रोल किया जा सकता है |


Thursday, 10 December 2015

Customize the Width of Blogger Posts

In this Blogger post, you will learn how to increase, change or customize width of your Blogger Template or blogger website - 

You might feel that your blogger or website template design need to change or customize then you can follow steps and customize /increase width of your blogger - 

Step 1 

Go to your blogger dashboard and click "template".  Now click on Customise button - 

customize width of your Blogger Template

Step 2

Now click "adjust width" on the left side and adjust width using slider button. You can use this slider to increase, decrease blogger width. Here are two sliders "Entire Blog" and  "Right sidebar". See below - 

Blogger width
Blogger width


Tuesday, 1 December 2015

What is cache memory in computer

What is Cache Memory or Caching in computer. Why cache memory is used in a computer system

Cache recently use information को temporarily store करके रखती है जिससे की जरुरत पड़ने पर stored information को use किया जा सके | इस प्रकार Cache एक high speed reserved area होता है जिसमे recently used information को स्टोर करते है जिससे की बाद मे data access स्पीड को बढ़ाया जा सके | Cache को broadly दो category मे divide किया जा सकता है -  
what is cache memory
cache memory
1) Memory Cache 
2) Disk Cache

1) Memory Cache - Memory cache ज्यादा effective होती है क्योकि ज्यादातर programs same data एवं instructions को बार बार access करते है| Memory Cache को cache store या RAM cache भी कहते है जो की memory का ही portion होती है | इसमे ज्यादा से ज्यादा इनफार्मेशन को slower and cheaper dynamic RAM (DRAM) मे रखने की जगह SRAM (जो की high-speed static RAM होती है) मे स्टोर किया जाता है इसलिए ही ये फ़ास्ट एंड इफेक्टिव होती है | 

2) Disk Cache - Disk Caching भी Memory caching के प्रिंसिपल पर ही काम करती है लकिन ये high speed SRAM की जगह पर conventional main memory को use करती है | Disk Cache main memory या memory का ही एक section होता है जो की CPU and Disk के बीच मे bridge का काम करता है | जब डिस्क को read कर लिया जाता है, data का block cache मे कॉपी कर दिया जाता | Next time, जब भी data की जरुरत होती है तो hard disk की जगह, cache से data read कर लिया जाता है  जो की fast होता है | 

Note - SRAM, DRAM की तुलना मे ज्यादा fast and expensive होती है| SRAM को CPU cache के लिए and DRAM को कंप्यूटर की main memory के लिए use किया जाता है|  

Sunday, 29 November 2015

What is SCSI Small Computer System Interface

What is Small Computer System Interface - (SCSI) and understand SCSI hard drive & devices


SCSI का दूसरा popular name "Scuzzy" भी है| SCSI एक इंटरफ़ेस स्टैण्डर्ड है जो की computers and peripheral devices को  physically कनेक्ट करने एवं data transfer करने के काम मे आता है | यह सबसे ज्यादा hard disk and tape drive मे काम आता है but SCSI को बहुत सारी other devices को कनेक्ट करने के लिए भी use किया जा सकता है जैसे की  scanners, printers and CD drives | SCSI ज्यादातर सभी operating system support करते है | जब SCSI introduce किया गया था तो यह data transfer speed and compatibility मे एक revolutionary step था क्यों की उस समय मे parallel data transfer popular था|  SCSI के अलग अलग इंटरफ़ेस है सबसे पहले इंटरफ़ेस को SPI (SCSI Parallel इंटरफ़ेस) कहा जाता था जबकि 2005 मे इसको Serial Attached SCSI (SAS) से replace कर दिया गया है | 
SCSI की help से best performance, faster data transfer transmission, and larger expansion किया जा सकता है for devices such as CD-ROM drives, scanners, DVD drives and CD writers | 

SCSI मे devices एवं SCSI bus के बीच data transfer के लिए एक "controller in charge" होता है यह या तो motherboard मे embedded होता है या फिर motherboard के expansion slot मे host adapter insert किया जाता है | Controller मे SCSI basic input/output system होता है (जो की एक small chip होती है) जो की सॉफ्टवेयर को access and device control देता है | Parallel SCSI bus की each डिवाइस मे एक नंबर 0 से 7 के बीच (narrow bus मे) या फिर 0 तो 15 के बीच मे (wider bus) assign किया जाता है | इस नंबर को SCSI ID बोलते है | 
SCSI Connector
SCSI Connector 

SCSI Hard Drive
SCSI Hard Drive


What is cookies in computer terms

Explain Cookies Definition in Computer or Internet 
Other Common Name - browser Cookie, Web cookie, Internet Cookie or HTTP cookie

जब कोई user internet पर किसी वेबसाइट को browse or visit करता है तो website के दवारा एक छोटी सी data file को उस computer पर स्टोर किया जाता है इसको web cookies कहते है | Next time जब भी यूजर वापस उस website को visit करता है तो web browser उस saved cookie को website के server सर्वर पर upload करके user की last activities को बताता है | Cookies को आपकी browsing history एवं other important information याद रखने के लिए ही design किया गया है जैसे की shopping website visit करते समय आपने कौनसे product को shopping cart मे add किया था या आपने गूगल पर कौनसा प्रोडक्ट सर्च किया था ये सभी cookies की help से ही पता चलता है |
वैसे तो cookies बहुत सारे काम करती है लकिन इसका important काम वेबसाइट की login information को store करना भी होता है कुछ website username and password दोनों information save करते है एवं कुछ केवल username | कोई भी cookies मे निचे दिया हुए components होते  है - 
  • Name
  • Value
  • Zero or more attribute 


Friday, 27 November 2015

How to Start a Blog on Blogger -Creating a Blog on Blogspot

How to Start a Blog on Blogger- 
Blogger Getting Started Guide

Before we start "creating a blog steps" lets know what is Blogger. Blogger is a Online service which allow user to publish multi-user blogs. Google owned it which was developed by Pyra Labs (launched in 1999). Google bought from Pyra labs in 2003. 

Step -1 - Type www.blogger.com URL on your web browser. and sign in with your google account. If you do not have blogger account sign up a new account. 

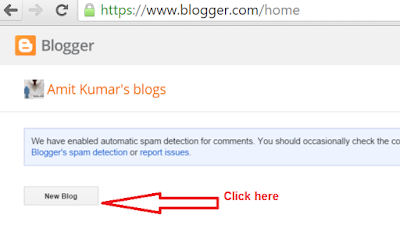
Step -2 - Once you login into the blogger account, you will see New Blog option in the left. Click here to start - see below - 

How to Start a Blog on Blogger
Step - 3 - Now in next box - Choose a suitable title, Name and Template (Design) for blog and click "Create Blog"- See below - 

How to Start a Blog on Blogger


Step - 4 -  You are done with basic template with default settings - Now you can start posting your items and pages from different available options. See below - 


Creating a Blog on Blogspot


Wednesday, 25 November 2015

What is Spanned and Striped Volume

What is Spanned and Striped Volume- In Hindi

Difference Between Spanned and Striped Volume

Spanned Volume मे दो या ज्यादा disk के unallocated space को मिला कर एक disk volume बनाया जाता है | दो या ज्यादा disk volume का साइज अलग अलग हो सकता है एवं जरुरी नहीं की वो same size के हो  | Spanned Volume बनाने के लिए minimum 2 and maximum 32 disk volume का use किया जा सकता है | जब Spanned Volume मे data save किया जाता है तो सबसे पहले डेटा को first volume मे स्टोर किया जाता है एवं जब वो full हो जाता है तो data automatically second or next disk मे store होता जाता है | इस प्रकार यह multiple disk के पुरे space को utilize कर लेता है but Spanned Volume मे परफॉरमेंस अच्छी नहीं होती है | Keep few points in mind for Spanned Volume - 

1. आप केवल NTFS or unformatted volume को ही extend कर सकते है |
2. एक बार Spanned Volume create करने के बाद आप उसके किसी एक portion को delete नहीं कर सकते | इसके लिए आपको full spanned volume remove करना होगा | 
3. आप spanned disk को mirror and striped volume के काम मे नहीं ले सकते | 

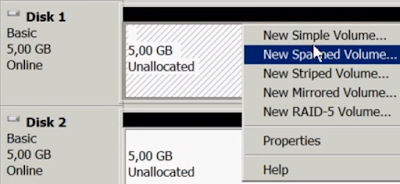
Pic 1 - Creating spanned volume from two equal size basic disks- 


create a spanned volume
creating spanned volume
Pic 2 - One 10 GB Spanned Volume created. 

create a spanned volume
creating spanned volume


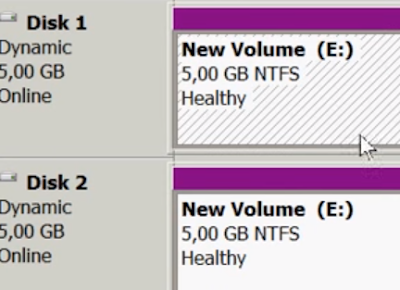
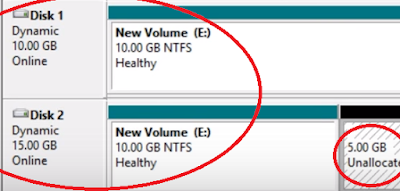
Striped Volume- यह spanned volume की तरह ही बनाया जाता है जिसमे की minimum 2 and maximum 32 unallocated disk volume use ली जा सकती है | इसमे सभी disk volume का size बराबर होना चाहिए | अगर आप striped volume बनाने के लिए unequal disk को use करते है तो ये उसमे से minimum disk size को add करके नया volume बनता है | जैसे की अगर आप एक 20 GB एवं 15 GB volume को use करके striped volume बनाना चाहते है तो यह 15 GB X 2 = 30 GB का नया volume बनाएगा | Striped volume मे data सभी disk (part of striped volume) मे concurrently write/store होता है | Striped volume do not offer fault tolerance. इसमे अगर एक भी डिस्क fail हो जाती है तो पूरा volume fail हो जाता है और फिर आप striped volume मे से data access नहीं कर सकते | 

Striped volume मे डिस्क की  efficiency and performance better होती है compare to snipped volume. 

In the first Picture - We are creating striped volume from two unequal basic disk volume - 


Create Striped Volumes


In this second picture - We have created one striped volume from two unequal disk volume. It shows one 5 GB unallocated space too. 


Create Striped Volumes

Tuesday, 24 November 2015

How To Set Up a Custom Domain in Blogger

Change Custom Domain Name for My Blog
Setup Custom Domain Name in Blogger


This is very much possible that you use blogspot domain name e.g hindipoetry.blogspot.com and later on you wanted to use your custom domain name. Your own custom domain name looks professional and easy to remember for users. Here, we are sharing tips to change blogspot sub domain name to your own professional custom domain name - See below - 

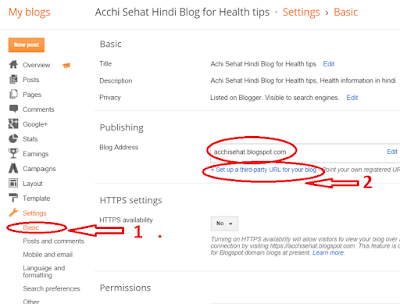
Step 1 - Go to your blog dashboard and then Settings on the bottom -> Basic Tab. Now under Publishing section, see your blogspot name and click on "set up a third-party URL for your blog" - 


Set Up a Custom Domain in Blogger

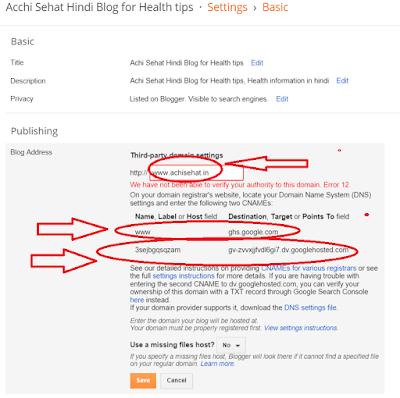
Step 2 -  Now enter your custom domain name (with www) follow Step 3. 

custom domain name in blogger
Set up a Custom Domain Name in Blogger


Step 3- It will prompt an error and also show you two CNAMEs. Each CNAMEs has two parts - one is "Name/Label/Host Name" and second is "Destination/Target/Points to".  First CNAME is same for every blogspot user but second CNAME is unique for every user as it is linked to your google account and blog. It is giving you an error because you have not linked your custom domain with google blogger hosting. Now you need to go to your Domain Provider and find DNS settings option. Under DNS settings add two CNAME given by blogspot.

Once you add these CNAMEs on your domain registrar or domain name provider, click save. Now it will save without any error. 


Step 4 - See above - If you want to open your website without www, this will not open until you will select above option (redirect domainname.com to www.domainanme.com). 

Monday, 23 November 2015

How to remove or take out sound in windows movie maker

How to mute sound on a video on windows movie maker

Many times you want to take out sound from your video clips using Window Movie Make software. You can use below simple steps to remove or adjust sounds from video clips in Window Move Maker.  

Step 1 

Open Window Movie Maker and add your video. Click on Edit Tab


Step 2

Click on Video Volume in the left, move the slider to the left or right to adjust  the volume. You can increase, decrease or mute video sound from this section. You can also do this for smaller clips or for full video.


mute sound on a video on windows movie maker

Sunday, 22 November 2015

Error failed to play test tone - Sound Won't Work on windows 7 8 and 10

No Sound, Error ! Failed to play test tone on windows 7, 8 10
Sound Won't Work on windows 7 8 and 10

Many users face this issue while working on windows machine. We are showing you few options which might resolve your windows machine sound issue.  You can try any of the below on your machine and let us know in comment section if it work for you so that it will help others- 

Option 1 

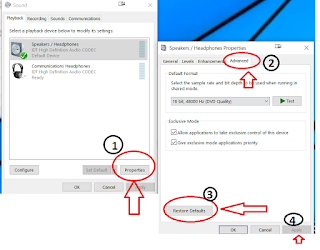
Go to your machine sound panel - either by control panel or type sound on start. Select your computer speaker and click on properties and then select advanced on next dialog box- Select "restore defaults"- Apply

Try this, it worked for many and may help you. See below

failed to play test tone

Option 2 

Open command prompt - (run as admin) and type command 
sfc /scannow. This will take some time and then you can reboot and check your computer speaker volume. See below - 

sfc /scannow
sfc /scannow

Option 3 

Go to your computer BIOS and enable Onboard audio if it is not enabled. 


Option 4

Go to Start -> Run -> services.msc


In "Services" window, select Windows Audio and restart this service. 

Option 5


Go to your machine sound panel - either by control panel or type sound on start. Select your computer speaker and click on properties and then select "enhancements" tab - > now click "Disable all Sound Effects" - >Click OK and apply
Try your sound now.


Option 6

If none of above work then you should remove your sound device driver and install latest drivers


Saturday, 21 November 2015

how to stop copying content from blogger

How to Disable /Stop Copy Paste content from your Blogger Blog

Prevent from Copying Your Content from Blogger


You might have faced this issue that people copy your blog post content and use it for their own purpose. They might use stolen content on their website or for other commercial purpose. Now don't worry we will provide a way which you can implement on your blog and prevent them. Follow steps - 
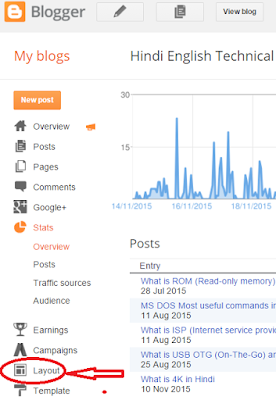
Step 1 - Login to your blogger account and go to Layout -

Prevent from Copying Your Content from Blogger

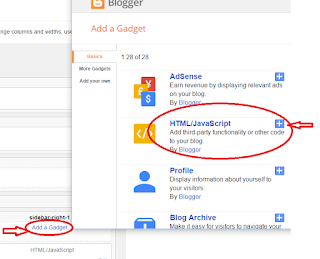
Step 2 - Once you click Layout tab, it will show many options - select "add a gadget" - In the Gadget, select select " HTML/Java Script" -

Prevent from Copying Your Content from Blogger

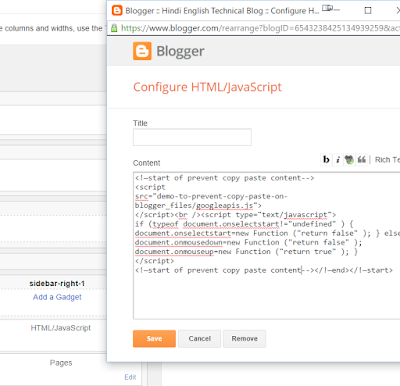
Step 3 - In the box- copy and paste content - (see below)

<!—start of prevent copy paste content-->
<script 
src="demo-to-prevent-copy-paste-on-blogger_files/googleapis.js">
</script><br /><script type="text/javascript">
if (typeof document.onselectstart!="undefined" ) { 
document.onselectstart=new Function ("return false" ); } else{
document.onmousedown=new Function ("return false" ); 
document.onmouseup=new Function ("return true" ); } 
</script>
<!—start of prevent copy paste content--></!—start></!—start>


Prevent from Copying Your Content from Blogger


Step 4 - save this and visit your blog. You will find that you can not right click anywhere on the blog content. 

Windows 10 keyboard shortcuts

Keyboard shortcuts - Windows 10 keyboard shortcuts


Here are some popular windows 10 keyboard shortcuts which are combination of two more more key. These windows 10 keyboard shortcut will help you in day to day windows activities - 

Friday, 20 November 2015

What is Credential Manager in Windows 10

What is Credential Manager in Windows 10
Credential Manager Command Line


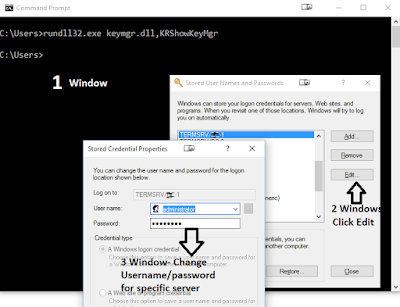
जब आप, आपके computer से network मे किसी भी resource, computer or website को access करते हो तो  Windows credential manager आपके username and password को सेव करता है | बाद मे जब आप उन resources को वापस access करते है तो आपको आपके credential नहीं देने होते एवं windows, credential manager मे save username and password को use करके आपको authenticate करता है | credentials स्पेशल folders मे save होते है जिनको की vaults कहा जाता है | बाद मे अगर आप किसी भी network resource का username and password change करते है तो आपको credential manager मे भी specific vault मे जा कर पासवर्ड change करना पड़ सकता है otherwise window automatic login will not work for that resource. 

You can access "Windows Credential Manger" from - 

Click Start - Type credential manager and select from the list or go to control panel and search credential manager. 

credential manager
credential manager dialog box

You can use command to open "credential manager" box - 

Open a command prompt, or enter the following in the run command -  rundll32.exe keymgr.dll,KRShowKeyMgr

credential manager command line


Thursday, 19 November 2015

Remove or Hide Blogger Navbar Topbar or Titlebar

How to remove or Disable blogger Top Bar / Navbar

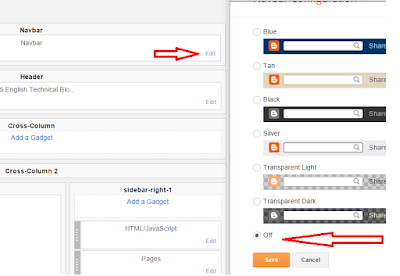
Every Blogger has default gadgets and one of them is Navbar on top. You can control these gadgets from Layout tab. Follow steps to disable, remove or choose another Navbar on your blog. 

Step 1- Login your Blog and go to "Layout" Tab 


Step 2 - On the NavBar, Click Edit. this will pop up Navbar window with different options. Scroll down and choose "Off" to disable Navbar from your blog. 


This is all. It will remove Navbar from your blog. Later on if required you can follow above steps and enable it.


How to enable or disable Hibernate in Windows 10

Disable hibernate in windows 10

You can ON or OFF hibernate in windows 10 using command:- 

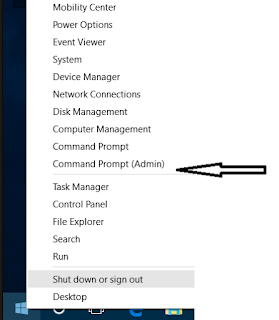
Step 1 - Click Start (windows logo) and select "Command Prompt" as admin - To do right click on the "command prompt" and select "Run as administrator"

Or 

Press Windows + X keys to open menu and select Command Prompt (Admin) option - See below 

Windows + X key in windows 10

Step 2 - On the Command Prompt Type - powercfg /h ON - It will enable hibernate on your machine

Step 3 - On the Command Prompt Type - powercfg /h off - It will disable hibernate on your machine

See Screen shot below - 

enable or disable Hibernate in Windows 10
Enable or Disable Hibernate in Windows 10

Wednesday, 18 November 2015

What is Port in Networking - In Hindi

Definition of Port in Networking - In Hindi 
Type of Ports in Networking
What is the use of Port Number

Computers and Networking की टर्म मे ports को mainly दो categories मे divide किया जा सकता है - Physical ports and Logical Ports

Physical ports computer or networking devices मे एक physical इंटरफ़ेस होता है जो की किसी डिवाइस से physically कनेक्ट करने के लिए काम मे आता है | कोई भी computer या networking devices मे बहुत तरह के ports होते है जिसमे कुछ internal ports हो सकते है जो की कंप्यूटर मे internal parts को connect करने मे काम मे आते है जैसे की disk drive, display card आदि | इसी तरह से कंप्यूटर मे कुछ external पोर्ट्स भी हो सकते है जो की computer / network devices मे outside की तरफ physically expose होते है and outside devices को connect करने के लिए काम मे आते है जैसे की प्रिंटर्स पोर्ट, Mic और external drive etc. 

Logical ports को software communication ports भी कहते है जो specific प्रोसेस एवं type of service को identify करती है | किसी भी communication session का origination एंड destination address तभी complete होता है जब पोर्ट के साथ host का IP address एवं communication protocol associate हो | 

Port Numbers :- एक port number 16-bit का  होता है जिसकी range 0 से 65535 होती है | Specific port number किसी भी specific service को identify करने के लिए काम मे आती है | हज़ारो ports मे से 1024 well known ports को convention ने hosts पर specific services type identify करने  के लिए रिज़र्व किया हुआ है | पोर्ट्स primarily used by Transport Layer protocols of Internet Protocol suite, such as User Diagram Protocol (UDP) and Transmission Control Protocol (TCP).

Example of Port Number - Port 80 is used for HTTP traffic. 

Popular ports - 

21: File Transfer Protocol (FTP)
22: Secure Shell (SSH)
23: Telnet remote login service
25: Simple Mail Transfer Protocol (SMTP)
80: HTTP used in the World Wide Web
110: Post Office Protocol (POP3)
143: Internet Message Access Protocol (IMAP)
161: Simple Network Management Protocol (SNMP)
443: HTTP Secure (HTTPS)
465: SMTP Secure (SMTPS)

Default userName and Password Dlink DI-624 Models

What is the default User Name and password for DI-624 Series Routers and Modem?

Dlink D-624 has many models and all have same user name and password - 

Dlink - DI-624, DU-624+, DI-624M, DI-624S, DI-624V2, DI-624V3, DI-624V5

Default User name and Password for all (above model) is admin / blank (no password)